Saturday, March 31, 2012
Gone Teachin' Latin American Influences
I'm off to teach Latin American Influences: Textile Inspirations today. Here are a couple of designs inspired by Guatemalan huipiles.
I used pre-cut adhesive craft foam shapes on a foam sheet for these designs.
I plan to take photos of student work to share tomorrow.
Friday, March 30, 2012
For the Birds: More Latin American Designs
Just a small flock of fabrics before I head off to work...
These were printed with two carved Speedball Speedy Stamp (Carve) blocks. The design was based on a motif from an ancient Peruvian weaving.
This piece was created with a block made from adhesive craft foam that I embossed with a ballpoint pen. I used one of Katherine's Mexican embroideries as inspiration. I'll have a step-by-step about this block design sometime in the next few days.
Off to sell beads!
Thursday, March 29, 2012
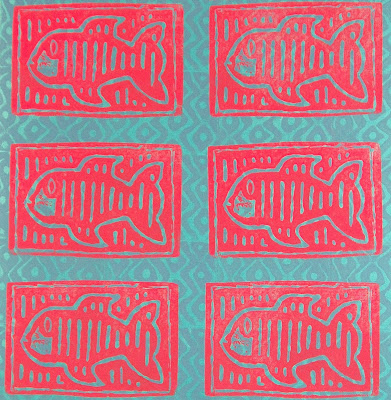
More Fish Stories: Doubled Freezer Paper Stencil
Yesterday, I showed how to make an embossed craft foam block. The same little fish mola was the inspiration for a doubled freezer paper stencil.
This is the fish mola stencil after I used it. You can see the construction; how the image is held together by the little strips of freezer paper called bridges.
I did a couple of samples using the stencil. The background for this sample is created by rolling and knotting the fabric before applying Transparent Pebeo Setacolor fabric paint with a foam brush.
In this sample I used both the embossed craft foam block and the doubled freezer paper stencil. The background was created by placing burlap under the fabric and rolling over it (a brayer rubbing) with transparent fabric paint.
I've been having so much fun creating the Latin American textile inspired pieces. The textiles from that part of the world are so colorful and the motifs so playful (especially all the animals). You can feel the joy in the original pieces and I hope in my samples, as well.
Wednesday, March 28, 2012
Craft Foam Print Block: Embossing Craft Foam with a Pen
As I mentioned in the Monday, March 26 post, sometimes you when you are trying too hard to make something work, you happen upon a different, possibly even better way to resolve things. So, it was over the weekend when I discovered a way to create a mola design using craft foam.
I was inspired by this small, simple fish mola design.
After reducing the image to 4" x 6", I made a tracing.
I flipped the tracing over onto a 6" x 9" sheet of adhesive craft foam and used a soft rubber brayer (roller) to transfer the design.
If you don't have a brayer, you can use the back of a spoon to transfer the design.
I did a few tracings as I wanted to try some different techniques. Since the adhesive craft foam sheets are very thin, it's easiest to peel off the paper backing and adhere them to a thicker foam sheet.
Once your design is adhered to the thicker foam, cut the foam to size. You are now ready to emboss the block. Use a ballpoint pen and press down hard as you draw around the outline of a shape. Continue to fill in the shape, pressing down hard to compress the foam.
This is what the block looks like after it's been embossed. Now it's time to print.
I use Opaque Pebeo Setacolor fabric paints and a Rollrite foam brayer. Roll the paint out on a piece of glass until the brayer is evenly coated with the paint. Roll an even coating of paint onto the block. Turn the block over onto your fabric and press down. It's best to print on a padded surface.
I printed some samples of the fish mola design for my Latin American Influences: Textile Inspirations class. I used painted backgrounds and first printed with a pattern block before printing with the embossed craft foam fish block. Tomorrow I'll have some samples using a freezer paper stencil I created using the same fish mola design.
Tuesday, March 27, 2012
Gifts
Last night was a night of gifts.
My yoga teacher and friend, Katherine G. gave them to me.
First, was the gift of having her as a teacher. She is a generous, calm and curious teacher. She is on her path and is willing to share what she discovers with her students. Last night she shared her experience of rediscovering a book, 29 Gifts: How a Month of Giving Can Change Your Life by Cami Walker. She explained that giving without expectation can lead to being more open and aware when the universe is bestowing its gifts to you. That we must learn to listen quietly to take in those gifts both large and small.
Katherine also gave me the gift of her generosity. I told her about my upcoming class, Latin American Influences: Textile Inspirations while she was at her home in Mexico. Last night, she presented me with a package containing some of the Mexican textiles from her collection. She is letting me borrow them for my class...I am thrilled! Here are those colorful, joyful textiles. Thank you Katherine.
Monday, March 26, 2012
Printing with the Cat Mola Stencil
So happy to see some new followers! Thanks for your support and hope you are enjoying and learning from my posts on surface design.
I spent most of the day yesterday in the studio testing out the print blocks and stencils and trying out a few new ideas. Not everything went according to plan...but that's how it is when you're trying something new. It's often when you are trying so hard to get one thing to work (that isn't) that you suddenly discover another way. I had a bit of that happen yesterday and will get into the results tomorrow.
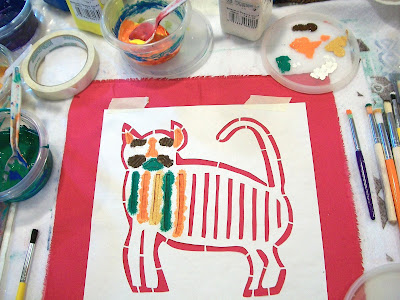
For today, I wanted to show you the results of the cat mola stencil. Although it looks similar to the cat mola mask I had as the first photo of the last post, there is a difference between the two.
The mask--made out of freezer paper-- is ironed directly onto the fabric. That means you can have as many little details as you can cut out of the freezer paper and iron on. The mask is pretty much a one shot deal. If you have few little bits to move, you may be able to get one or two more prints out of it but the more detailed, the more difficult that is to do.
The stencil, also made of freezer paper (doubled), has small bridges that link the little parts together. These remarkably sturdy stencils can be picked up and moved around because all the parts are one unit. You can use them over and over and in fact, the dried fabric paint seems to make them even stronger.
I decided to use multiple colors for the cat mola stencil. Because of the details, I used stencil brushes rather than a foam dauber. I put small amounts of the Opaque Pebeo Setacolor fabric paint on plastic lids and only picked up a little at a time to apply to the stencil.
I actually did two very similar prints. One is at the top of this post and the other is here.
My friend, Carolyn Brougham commented the other day that she thought she recognized the cat mola designs. The original mola was purchased on a trip with Carolyn to visit her parents who were living in Bogota, Columbia at the time. I have a lot of great and interesting memories of that visit as that was my first real trip to a foreign country.
Saturday, March 24, 2012
Latin American Influences: Working on Designs
 |
| Freezer paper mask of cat mola design |
I spent a lot of time this week in the studio working up some designs for the Latin American Influences class. For inspiration, I looked at the textiles I own and poured over books of ancient Peruvian weavings and Guatemalan huipiles.
I love the strange god figures in the ancient textiles and all the animal motifs that form Escher-like designs. There are definitely some future cloth figures coming from these inspirations. But in the meantime, the focus is on the class.
 |
| Freezer paper stencils and carved blocks of animal motifs |
I designed and cut some freezer paper masks and stencils based on my molas. I'm brainstorming different ways to create mola designs with block prints, masks and stencils (and combinations of the three). I'm excited to see what discoveries arise out of my experiments. A lot of fabric printing must be accomplished this weekend.
Friday, March 23, 2012
Gelatin Plate Printing: Dandelion (9) Patch
Every time I play with the gelatin plate, the focus is a little different. I may start with many of the same or similar materials, but where the path leads in a particular printing session is always a little serendipitous.
My focus landed this time on dandelion heads and yarn and the concept of a nine patch quilt. I like the play on words as well...Dandelion (Nine) Patch.
Here is a selection of photos from my gelatin plate printing session (see the March 21 and 22 posts for more information about creating your own gelatin plate).
Subscribe to:
Posts (Atom)


